


Brooklyn Children's Museum - 10:00 AM Pick
Brooklyn Children's Museum - 10:00 AM Pick
YM & YWHA of Washington Heights and Inwood - 10:30 AM Pick
Children's Museum of Manhattan - various times Pick
Grand Central Gallery Annex - 10:00 AM
New-York Historical Society - 11:00 AM
Bay Ridge Prep Lower & Middle School - 9:00 AM
Children's Museum of Manhattan - various times Pick
Children's Museum of Manhattan - various times Pick
Children's Museum of Manhattan - various times Pick
Sugar Hill Children's Museum of Art & Storytelling - 11:00 AM Pick


Activity Guides
- Beaches & Lakes
- Best Of Lists
- Birthday Parties
- Boats
- Boredom Busters
- Camps
- Childcare
- Christmas/Hanukkah
- City Guides
- City Hacks
- Classes & Enrichment
- Community
- Crafts & Recipes
- Earth Kids
- Easter
- Fairs & Festivals
- Fall Activities
- Family Travel
- Farms & U-Pick
- Free Activities
- GoList
- Halloween
- Holidays
- Hotels & Resorts
- Indoor Activities
- Museums
- News & Openings
- Outdoors
- Parent Talk
- Parks & Playgrounds
- Play Gyms & Sports Centers
- Pools & Spray Parks
- Preschools & Schools
- Restaurants
- Shows
- Skiing & Winter Sports
- Special Needs
- Special Occasions
- Sports
- Spring Activities
- STEM
- Stores & Services
- Summer Activities
- Theme & Water Parks
- Trains, Dinos & Heroes
- TV, Film & Movies
- Virtual
- Visitors Guide
- Weekend Events
- Weekend Trips
- Winter Activities
- Zoos & Gardens
Icky, Squishy, Slimy, Smart: Halloween STEM Activities Kids Can’t Resist

Add some spook to your science with these Halloween STEM activities guaranteed to mesmerize your little goblins and ghouls. There’s no better time than Halloween for kooky concoctions and bubbling brews that are as entertaining as they are educational. These easy Halloween experiments are chock-full of surprises, from the slimy to the sparkly, and will spellbind scientists of all ages.
Keep the creepy creativity going with our 75 Halloween Crafts and Treats for Spooky Fun. Want more STEM inspo? Browse our Guide to Science Experiments for Kids, where you'll find our favorite experiments for preschoolers, DIY slime recipes, and more to keep your aspiring scientists and engineers engaged all year long.
OUR LATEST VIDEOS
Why Halloween STEM Experiments Are So Effective (and Fun!)
There’s nothing I love more than a good theme, and Halloween is my favorite excuse to tap into my inner Miss Frizzle (IYKYK). The sights and sounds of the spooky season make it the perfect sensory playground. Bright contrasting colors, decor of all textures, engineering DIY costumes, and all the goo and gore in between are made for messy play and scientific exploration. Kids can hone their critical thinking skills while feeling (frightfully) festive, and you get to be the bewitching wizard who thought of it all.
Halloween STEM Activities for Toddlers & Preschoolers (Ages 2–5)
These simple, safe, and sensory-friendly activities are perfect for preschoolers who like some spook without the scare.
1. Bubbling Brew
What: A witch’s brew in a toddler-safe cauldron
Supplies: Bowl, baking soda, vinegar, food coloring, spray bottles, pipettes, spoon
How: Fill your cauldron (okay, bowl, but be fun and call it a cauldron) with baking soda. Invite your wee witches to add vinegar using spray bottles and pipettes. Add some food coloring and watch the brew bubble and fizzle.
Spooky Twist: Add plastic spiders, eyeballs, and other creepy crawlies to your brew.
2. Melting Ghosts
What: Googly-eyed ice cube ghosts that melt with a sprinkle of salt
Supplies: Googly eyes, white paint, salt, pipettes
How: Fill a pitcher with water and mix in some white washable paint to make your water a ghostly white. Pour the white water into an ice tray and add lots of googly eyes, then freeze. Pop your ghosts out of their trays and invite kids to melt them using salt and warm water with pipettes.
Science Fact: Water usually freezes into ice at 0°C (32°F), but salt makes the freezing point even lower which makes the ice melt.
3. Slimy, Squishy, Sensory Spaghetti
What: Spaghetti sensory play with a spooky twist
Supplies: Spaghetti, olive oil, liquid watercolor, plastic bag, Halloween-themed items
How: Cook a box of spaghetti (under cook so your noodles are firm), drain, then add a bit of olive oil to keep the pasta from sticking. Once fully cooled, put the noodles in a plastic bag and add food coloring or liquid watercolor of your choice. Shake until the spaghetti is fully coated with color. Allow your dyed noodles to dry completely in a pan. Once dry, arrange them in a bin with plastic spiders, eyeballs, orange and black pom-poms, or other critters for your little scientists to unearth and investigate.
Spooky Twist: Got a brave kid? Have them close their eyes or break out a blindfold and tell them its worms or brains to really creep them out!
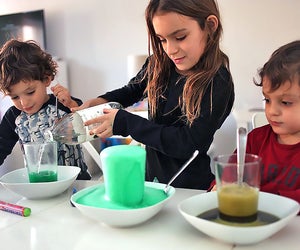
4. Spooky Slime
What: Slimy sensory play that’s taste-safe for the littlest scientists
Supplies: Cornstarch, water, instant pudding mix (We recommend a ghoulish lime green.)
How: Combine 1/2 cup of cornstarch with 1/4 cup instant pudding mix. Slowly stir in 1/3 cup water, then add up to another 1/2 cup of cornstarch until you get the desired stretchy consistency. Or, try one of our five simple slime recipes (which use different ingredients). Add some googly eyes to your goo and get squishing.
Science Fact: Known as non-Newtonian fluid, this type of slime will change its consistency depending on how much pressure you apply to it. Give it a squeeze to feel it solidify, then let it go to liquefy.

Ghosts that magically appear are a spooky surprise. Photo by the author
5. BOOtifulSpooky Surprise Ghost Art
What: Invisible ghosts that magically appear when painted
Supplies: White crayon, white paper, watercolor paint, paintbrush
How: Prep the surprise by using a white crayon to draw ghosts on a white piece of paper. Invite your little artists to paint the paper with watercolor to reveal your "bootiful" artwork.
Science Fact: This is a classic "resist" technique—the wax in the crayon pushes the water in the paint away, allowing the drawing to come through.
6. Glowing Water
What: A glowing sensory jar to captivate your mini monsters
Supplies: Glass jar, non-toxic highlighter, water, tongs, flashlight or black light
How: Fill a jar with warm water, then pop open the end of a non-toxic highlighter. Drop the ink tube from the marker into the water to soak. Give it a squeeze with some tongs. Turn off the lights and shine a flashlight (or better yet, a black light!) through the jar and watch it glow.
Spooky Twist: For a spooky seek-and-find, add plastic eyeballs, creepy crawlers, or skeleton figurines.
Slimy & Squishy STEM for Early Elementary (Ages 5–8)
Here are some creepy chemical reactions, chilling challenges, and eerie experiments to occupy the bigger kids.
7. Exploding Pumpkin Volcano
What: They'll lava (sorry) this trick-or-treat twist on a volcanic classic.
Supplies: Pumpkin, baking soda, vinegar, dish soap, food coloring
How: Scoop the guts from a pumpkin (that’s part of the fun!), then fill it with 1/4 cup baking soda. Add a squirt of dish soap and a few drops of food coloring. Pour vinegar into the pumpkin and watch it erupt!
Spooky Twist: To create more exits for your explosion, carve the pumpkin into a full jack-o'-lantern first.
8. Static Electricity Dancing Ghosts
What: Get your ghosts dancing with static electricity.
Supplies: Tissue paper, balloon, markers, scissors
How: Cut small ghost shapes (about two inches long) from tissue paper and add spooky faces with marker. Blow up a balloon and rub it on a head full of hair for about 10 seconds to generate static electricity. Hold the balloon near the tissue ghosts and watch them wiggle.
Science Fact: Opposites attract! Rubbing the balloon on a material like hair or even a sweater transfers electrons to the balloon, creating a static charge that attracts the cellulose in the tissue paper. BOOm!
9. Glow-in-the-Dark Oobleck
What: Oobleck that lights up the night!
Supplies: Cornstarch, tonic water, black light
How: Mix two parts cornstarch with one part tonic water. Voila—oobleck complete! Now take it into a dark room, turn on a black light, and squish the glowy goo to your heart's content. Bonus if you add some glow-in-the-dark Halloween-themed figurines.
Science Fact: The tonic water glows because of a chemical it contains called quinine that fluoresces (or glows) under ultraviolet light.
10. Floating Ghost Balloon
What: Levitate a ghost like magic using chemistry.
Supplies: Balloon, permanent marker, baking soda, vinegar, empty bottle
How: Use a permanent marker to draw a ghost face on a deflated white balloon (or draw monster faces on a balloon of any color). Pour one tablespoon of baking soda directly into the balloon (a funnel can be helpful), then set the balloon aside. Fill an empty water bottle with 1/2 cup of vinegar, then carefully stretch the end of the balloon onto the bottle–don’t let the baking soda fall into the bottle just yet! When you’re ready for the big "ta-da," lift the balloon upright so that the baking soda falls into the bottle. Watch as your ghost magically inflates!
Science Fact: In this chemical reaction, the vinegar and baking soda mix to create carbon dioxide that fills up and inflates the balloon.
Creepy STEM Projects for Big Kids (Ages 8–12)
Your oldest mad scientists will love these engineering challenges and chemistry experiments that are just the right mix of spooky and smart.
11. Candy Catapult
What: Engineer a catapult and see how far you can launch your candy.
Supplies: Jumbo craft sticks, rubber bands, bottle cap, glue
How: Hand over lots of craft sticks and rubber bands and challenge your aspiring engineers to fashion them into a catapult. You might be surprised with what they come up with on their own. For more detailed instruction, this project can benefit from a YouTube tutorial to start you off with how to stack and arrange the sticks.
Science Fact: A catapult demonstrates how stored energy (aka potential energy) can turn into motion (aka kinetic energy). The farther back you pull, the more energy gets stored, making your candy fling further!
12. Halloween Lava Lamp
What: DIY lava lamp with haunting hues in a bubbling brew
Supplies: Jar, cooking oil, water, Alka-Seltzer tablets, small plastic Halloween items
How: Fill 3/4 of a jar with cooking oil and the rest with water, then add food coloring in dark colors. Observe how all the liquids interact with one another as you go. Drop in an Alka-Seltzer tablet to make your mixture move like a witch’s cauldron. Add in some plastic spiders and other Halloween accessories and see how they bounce around the bubbling brew.
Science Fact: Water is denser than oil, causing it to sink to the bottom of the jar. When you add the tablet, it reacts with the water to make carbon dioxide bubbles that carry the colored water through the oil where they rise, pop, and fall, creating that lava lamp effect.
13. Rotting Pumpkin Laboratory
What: Be a decay detective. Dissect, inspect, and watch your jack-o'-lantern rot!
Supplies: Carved pumpkin, magnifying glass, gloves
How: Carve a pumpkin into a jack-o'-lantern and set it outside. Observe and document its changes over the course of 10 days (or more if you’re brave). When it starts to rot and mold, that’s when the real (gross) fun begins! Track its transformation in color, texture, and smell. Bonus if you leave it for months and track how long it takes to completely decay.
Science Fact: When a pumpkin is cut, the exposure to air accelerates its decay. Bacteria, microorganisms, and temperature all contribute to the rotting process—yum!

Building skeleton bridges is a fun and festive science experiment. Photo by the author
14. Skeleton Bridge Challenge
What: Build a bridge of bones strong enough to hold your Halloween candy.
Supplies: Cotton swabs, tape, candy
How: Using just cotton swabs (aka bones) and tape, construct a bridge. Incorporate time for planning and lots of trial and error as you see how many pieces of candy your skeleton bridge can hold.
Spooky Twist: Up the stakes with some challenge constraints like how many pieces of candy the bridge needs to hold or how long the bridge should be, or set a timer to make everyone sweat.
15. Bat Paper Plane
What: Paper airplanes, but make them fang-tastic.
Supplies: Black paper, ruler
How: There are lots of possibilities here, from printables to YouTube how-tos. For a good start, check out our tutorial on how to make the best paper airplanes.
Science Fact: The aerodynamics of both a real bat and your paper bat depend on wing shape and how air flows over them. Experiment with different folds and lengths of wings and see which flies farther.
16. Candy Chromatography
What: A colorful chemistry experiment with your leftover M&Ms and Skittles
Supplies: M&Ms or Skittles, a white plate, warm water
How: Arrange your candy in a circle on a white plate. Carefully pour warm water into the center of the circle until it touches all of the candy pieces. Watch the dye in the candy run together into a delicious rainbow.
Science Fact: The water dissolves the candy's water-soluble coating, which spreads to the center through a process called diffusion.
STEM Supplies You’ll Need for Educational Halloween Fun
Keep your spooky science lab stocked with the following supplies:
- Baking soda
- Vinegar
- Cooking oil
- Cornstarch
- Tonic water
- Food coloring or liquid watercolor
- Balloons
- Pipettes
- Spray bottle
- Funnel
- Black light
- Halloween-themed extras: plastic eyeballs, spiders, googly eyes, mini skeletons, figurines
Safety Tips for Halloween Science Fun
- Always supervise young children when doing these spooky STEM activities.
- Consider having gloves and safety goggles on hand.
- Use taste-safe materials for toddlers.
- Handle black lights and chemicals with caution.
- Be mindful of allergens when doing edible Halloween STEM activities.
- Keep wet wipes handy!
FAQs About Halloween Science Activities for Kids
Q: Are these Halloween STEM experiments safe for toddlers?
A: Our selections for kids ages 2-5 use washable, edible, or non-toxic materials that are perfect for preschoolers and scientists who toddle.
Q: How do I adapt certain STEM activities by age?
A: Our categories offer a guide, but all projects can be scaled up or down depending on a child's age. Dial it up for older kids by adding steps, asking them to make hypotheses and record their observations.
Q: Do I need fancy STEM supplies for these spooky STEM activities?
A: Nope! Most experiments use ingredients you probably already have in the kitchen, like baking soda and vinegar. However, if you want to add something fancy we recommend getting a black light for glow-in-the-dark explorations.
Q: Can I do these Halloween STEM activities in a classroom?
A: Absolutely! These STEM experiments are great for school Halloween parties, science stations, or group activities.
Q: Are these Halloween STEM experiments gluten-free/sensory-friendly?
A: Most are! Ingredients can be modified to avoid common allergens, and textures that might not appeal to specific sensory sensitivities can be easily swapped out.
Disclaimer: This article contains some affiliate links, which means we might earn a small commission if you make a purchase. There is no extra cost to the reader. We only recommend products and services that we have personally used or have thoroughly researched.